Help with Basic Parameters of the Magic Designer Windows Program


In order to make a design you need 5 things to be in place. The pair of pen arms counts as two. The setting of the shift lever. The circular paper. And a pen. The computer selects a white paper and thin black pen for you by default.

To summarize this simple process:

  1. Make a paper by pressing Max Circle (or make your own ellipse or circle). In 2009, the Max Circle comes automatically.
  2. Make the desired settings. (Letters on both arms, and setting for the shift lever)
  3. Press the Draw button.
  4. Repeat steps 2 and 3. Or, you can go back to 1.
The very first thing that you can do is to make your own paper size. There are several ways to do this. Place the mouse in the drawing window. Press down on the left button and hold it. Drag (move) the mouse. You will see an ellipse being banded (following) the mouse. You can even leave the area in the window. To establish an ellipse as the paper, stop pressing down the left button on the mouse. On the status line are three sets of numbers which are feedback on this process. An ellipse can be thought of as a rounded rectangle. A rectangle has 4 corners. Pick one corner and its opposite corner. The Bx,y is pixel coordinates of one corner and Exy is the pixel coordinates of the opposite corner. When dragging the mouse, one or the other or both of these sets of numbers changes. When done and drawing designs, the ellipse is the paper for that design. In the picture here, there is the ellipse shown which was used to draw the designs in the middle. And 4 additional ellipses were made to draw designs in the corners. It would be like if someone had the physical toy and made a collage of papers. Of course, in the program not only can one position the ellipses, but they can be of different sizes, and flatness. The Cx,y is the current mouse pixel position. It is always active whenever the mouse is inside the window. It does not take part in the design.

At any time one can press the button which is a red circle with 'Max' in it. This will make a circle for you which is the maximum possible size for the drawing window. The program was deliberately designed for an 800x600 size screen to max a maximum sized circle of 575.

One can press the Esc key to toggle the size of the Drawing area back and forth to the whole physical computer screen. When in full screen some operations are still available using the hot keys. The way to hide the application to the task bar is to click on the minimize square of the Parameters title bar. The way to end the application is to click on the X in the Parameters title bar, since the Paper section shown here does not have that.

I refer to the arms as left and right, assuming you are operating the toy. The 'Upper' in the toy instructions (see pdf)  refers to left, and 'lower' refers to right. The term I use is gear and peg, and these refer to 'crank disc' and 'crank pin'. I also consider the circle stud in a similar way.

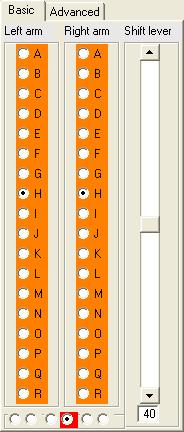
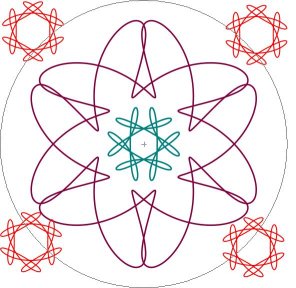
Each of the arms has a letter from A through R, and the shift lever goes from 10 to 70. The computer program starts by specifying the design of 60CC, which is a 6 sided clover.

A good thing to do to start is to copy the designs in the toy instructions. Most of these designs are specified in a similar manner.

There are 6 options of where the arms are located. It is best to visualize this with the photo of the Magic Designer.:
  1. Left arm is on left stud and right arm is on left gear.
  2. Left arm is on left stud and right arm is on right gear.
  3. Left arm is on left stud and right arm is on right stud. This is how one draws a permanent circle. Do not confuse this with the paper emulation where there is a temporary circle.
  4. Left arm is on left gear and right arm is on right gear. This is the default and almost all of the time you will use this setting.
  5. Left arm is on left gear and right arm is on right stud.
  6. Left arm is on right gear and right arm is on right stud.

These options are mutually exclusive and selected with the radio buttons from left to right. Some of these options are never used with the real toy, since the crank handle, which is used to turn the gears sometimes interferes with the arms. This is one of many "issues" which makes a computer different from a real life toy. See this and others in the Notes page.

With all circle stud options other than the red one, the values for advanced parameters are calculated, but the fields in the Advanced tab cannot be changed. Changing the circle stud also is like pressing the Default values button on the Advanced tab.